
I’ve made the Papercut Patterns Saiph tunic once before. I won’t take the time to review the pattern – all I need to say is “I love it”. I cannot remember the last time I sewed straight up from a pattern without wanting, or needing, to make any alterations. Ok, just a couple of teeny tweaks (I omitted the back closure and made it a more dress-like 15cm longer). My favourite thing? The pockets! I love those pockets.
This is my much loved and very often worn denim version…

And so on to Saiph take two – the funnel neck Saiph. A few months ago I purchased some lovely ivory coloured organic sweatshirt knit fabric from The Village Haberdashery. Lucky me, I had some vouchers to spend, gifted to me for my birthday. I didn’t have a plan for it when I bought it, but as they do, an idea popped into my head (probably in the middle of the night when all the best sewing plans are made) for a funnel neck Saiph.
A funnel neck is a super easy neckline adaptation which would work on all kinds of patterns, though I think it’s definitely one for knit fabrics rather than woven. Here’s how I adapted the Saiph tunic pattern.
The first step is to make two simple pattern alterations. For a knit fabric (actually probably for all fabrics in the case of the Saiph) there is no need for the back neck closure. Trace the main back pattern piece to remove the 1cm seam allowance. In the image below left I marked a green line to show the original cutting line, and you can see that my new cutting line is 1cm in. This piece can now be cut on the fold, rather than as two separate pieces to seam.
The second alteration, below right, is to lower the neckline all around by 1cm. Line up your front and back pieces at the shoulder seam to make sure that you still have a nice smooth curve. My new cutting line is in blue.
")
")
Now you need to measure your neckline with a tape measure. To be really accurate you need to exclude the seam allowances. There is no need to draft anything new, just mark the seam lines onto your pattern (1cm in from the cutting lines) and carefully measure the neckline. Remember there is no seam at centre back or front – these are cut on the fold. Measuring the neckline on your pattern pieces will give half the neckline so you need to double it to get the full neckline measurement. My neckline on a size small Saiph was 62cm.
To draft your funnel neck, use the neckline measurement to draw the long base of a rectangle. For the height of the funnel you need to decide how tall you want your funnel neck to sit. I made mine 15cm tall. Then, you need to add your seam allowance of 1cm to the bottom edge and to both short sides. Don’t add a seam allowance to the top edge because you are going to cut this on a fold so that you have a doubled piece of fabric. My final pattern piece measured 64cm x 16cm. Mark the top edge to be cut on the fold so that you don’t forget this.
Now you’re ready to get all of your pattern pieces cut out, and sewn up. I constructed the whole garment before getting on with the neck, but you can choose to complete the neck any time after you have sewn the shoulder seams.
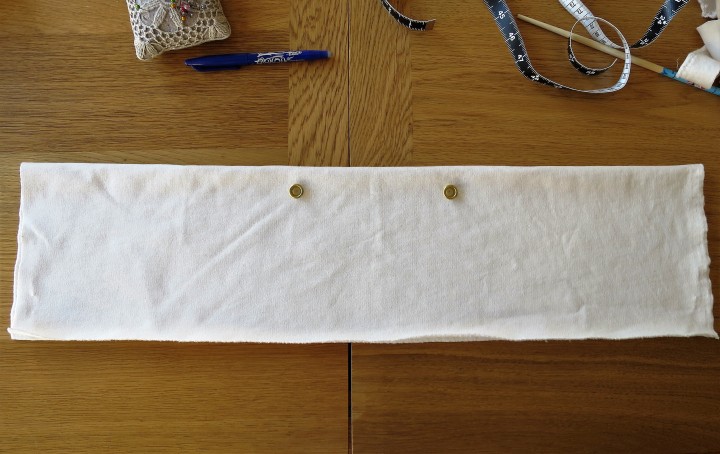
If you want to add eyelets and a drawcord then you need to fit the eyelets before sewing any of the funnel neck. In the image below I have just added the eyelets. Fold your neck piece as below, so that the fold is at the top and the raw edges meet at the bottom and sides. Mark the centre top with a pin or fabric pen and measure along to where you want your eyelets positioned. Mine are 15cm apart, so 7.5cm either way from the centre. Mark your points 2.5cm down from the top folded edge and this is where you need to add your eyelets. The eyelets are easy to come by in haberdashery shops and come with instructions and tools so I won’t go into setting details here. You could alternatively stitch buttonholes but I don’t think they’d be quite as durable. Once you’ve marked the eyelet positions, make sure you open the fabric up before adding these as you only want to go through one layer! It’s a good idea to strengthen the eyelet area with a scrap of fabric or interfacing.
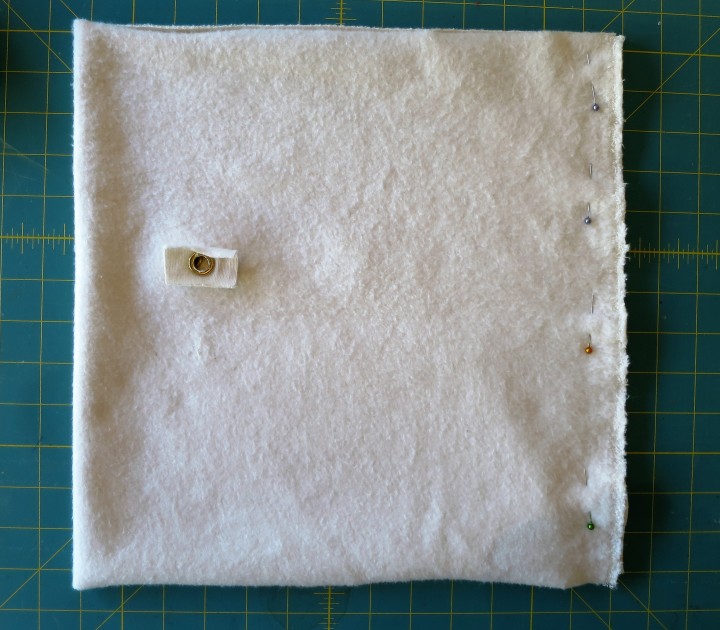
Once these are in place, with the fabric opened out, you need to fold the fabric with right sides in, bringing the two short sides together (see image below). Sew the seam with your 1cm seam allowance, turn the right side out, and fold along the length.
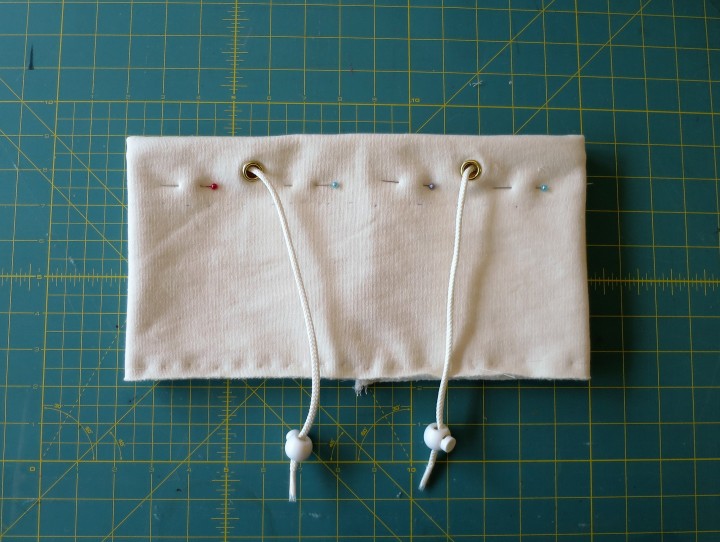
You should now have something that looks like a funnel neck! At this stage you can thread your cord, to save fiddling with it later. Fit the cord into place (mine was 1m long) and pin all around underneath it to keep it in position. In the image below I have placed the cord and pinned. I then marked 5cm down from the top, ready for top stitching to form the cord channel. And finally, the bottom raw edges were pinned evenly and basted together for easy sewing to the neckline later.
The next step, as mentioned above, is to stitch all the way around to enclose the cord in a channel. I used the chain-stitch on my cover-hem machine for this, but you could probably get away with a simple straight stitch on your standard sewing machine as this is not going to be a high-stretch area. Or a zig-zag stitch if you’re worried about stretch. I used a piece of tape as a stitch guide (along with my fabric pen marks) to ensure a nice evenly stitched line.

You’re nearly there! All that remains is to sew the funnel neck to the tunic. Mark the centre front and centre back on the neckline (below left). Mark the centre front on the funnel as well (the seam on the funnel is the centre back). Flip the funnel inside-out and pin it right sides together to the neckline – match the centre points and pin all the way around. You should have three layers pinned evenly with the raw edges meeting, as in the image below right.
")
")
The final stage is to sew this seam and admire your new funnel neck creation! Here’s mine…


Thank you!! This is exactly what I was looking for. Next search…tutorial for invisible zipper in in-seam pockets…
LikeLike
Glad to be of service – good luck with your hunt!
LikeLike